Banana, blueberries, cherry, coffee, cream. These are all great ice cream flavors! Especially the first two! But because of the cold weather outside, we are not going to talk about ice cream. Instead, we will talk about one of the great features of the Android Gradle plugin called Flavors.
What are Flavors?
The idea behind that feature is relatively simple. It provides version customization possibilities. In other words, we can provide different version of the same application with some minor differences. Based on that, a single project can have multiple different flavors.
Why do we need them?
There are several reasons for using flavors. For me, the most obvious one is when you want to develop a white-label product. In Wikipedia the term is described in the following way:
A white label product is a product or service produced by one company (the producer) that other companies (the marketers) rebrand to make it appear as if they had made it.
If we try to relate that description to the mobile world, we can use the idea of RSS readers as an example. Imagen we have an application which can consume such a feed. Somehow we managed to sell that app to ‘New York Times’, but then ‘The Guardian’ wants a RSS reader as well. Instead of writing the whole application from the ground bottom, we can just create a new flavor of the version we currently have, change the UI layer, align the feed tags with the one used by the guys from ‘The Guardian’ and sell the app to them as well. And so the application / product we have is a white-labeling product.
How to use them?
As mentioned previously, that feature is provided by the Android Gradle plugin. Thus, whenever we want to work with flavors we have to edit the Gradle files in our project. To be more precise, we need to make changes in our build.gradle file.
Defining a new flavor is easy:
Each and every new flavor has to be included in the productFlavors block. After defining our flavors we can check them from the Build Variants panel (View > Tool Windows > Build Variants).
Each defined flavor has the same properties as the defaultConfig. Everything described in the defaultConfig block can be used in a flavor block as well. This is because the defaultConfig actually belongs to the ProductFlavor class. The defaultConfig block can be found in your build.gradle file.
The properties and methods which can by used inside of a newly defined flavor are actually a lot. They are described in the ProductFlavor class mentioned above. Some of them are:
- applicationId
- versionName
- versionCode
- buildConfigField (type, name, value)
- minSdkVersion / maxSdkVersion
Most of them are self explanatory, but applicationId and buildConfigField are not. The applicationId property sets the id of the application. Surprise! Surprise! But why do we need to assign a new id to our flavor? There are several reasons for doing that, but one of them is the fact that you can not have two applications with the same id on a single devices. Thus, by giving a new id to your flavor you can actually keep two separate installations on your app on the same devices. That’s useful for testing and when doing demos.
The buildConfigField method is useful when you want to predefine particular build configurations to your flavor. These configurations can vary in type, name and value. For example, that’s useful when your flavors are using different host addresses for server communication and in many other situations.
Lately you can access the values predefined in the buildConfigField method from Java in the following way: BuildConfig.HOST
Source code and resources
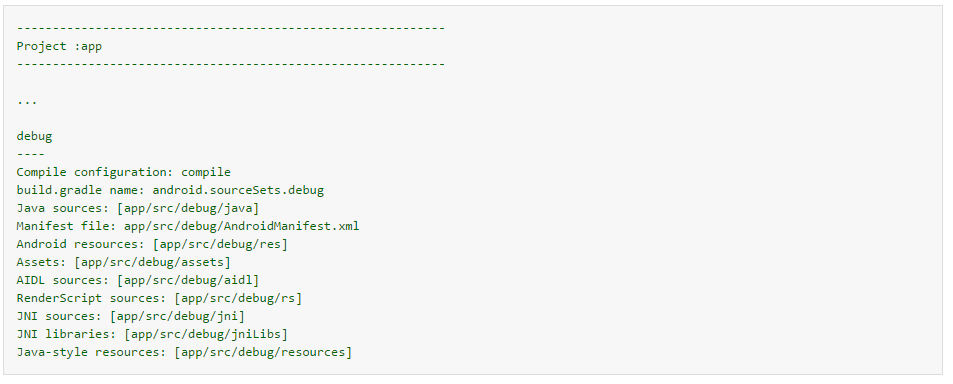
Although, the flavors are relatively similar, there are some small differences between them as well. These differences can be related to the source code, the drawable resources, the assets, etc. But they all share one base set of Java code, icons, strings and so on. Happily, the Android Gradle plugin can give us some hints on how to structure all the folders for our flavors. There is a handy task which will create a small report, based on the flavors we have. In the report you will find the exact path and naming for the important folders and files (java, res, assets, Manifest, etc.) for each flavor.
To generate this report do the following:
- Click Gradle on the right side of the IDE window.
- Navigate to MyApplication > Tasks > Android and double click sourceSets.
- To view the report, click Gradle Console at the bottom of the IDE window.

This report can be really useful, because of the fact that Android Studio does NOT create the needed source set directories for each flavor.
Build variants VS Flavors
If you know a thing or two about build variants and flavors, but the distinction between these two entities is still not clear in your head, I highly recommend you to go through the following StackOverflow discussion - http://stackoverflow.com/questions/27905934/why-are-build-types-distinct-from-product-flavors
Resources
- http://blog.brainattica.com/how-to-work-with-flavours-on-android/
- https://developer.android.com/studio/build/build-variants.html
- https://objectpartners.com/2015/03/31/using-android-product-flavors-to-build-full-and-demo-version-of-the-app
- https://en.wikipedia.org/wiki/White-label_product
Feel free to share, comment & give your opinion on the topic!
